The first thing that struck me when dipping a toe into Continuous Integration is the barrier of entry that I feel is quite high. I’ve had some hard time finding information about how to to properly get on with the subject, get a grasp of the tools and the code needed. I can say it properly kicked me out of my comfort zone, especially as I was not surrounded by people who had done it before from whom I could have learned more easily. Special thanks to James Dumay for his time and help. I’ve also found this google group full of helpful people.
Strategy
First lesson that I learned is that it’s better to establish a strategy. Jenkins is a powerful tool that can be used to do many different things. So what do you want it to do? I did not know at the time and that diserved me, but I ended up finding one : I consider Jenkins as a team mate, whom I can ask to put our code into production (or staging) when we push code on specific branches (master and develop).
If that were you that would be asked to push code into production manually, which steps would be required?
- Pull the latest changes from the develop branch
- Install composer vendors
- Install node vendors
- Compile assets (Sass to CSS for example), combine, minify, timestamp
- Test that everything is all right all around
- If yes send the code to staging
- Migrate db changes to staging
- Test that everything is all right all around
- Notify project managers that the changes are online
That’s what I’m going to ask Jenkins to do for me. That would automate all the process to push code into staging here, and apparently that is called a pipeline.
The obvious benefit of automating this is to save the time it takes a developer to do this manually every time, but there are also some other advantages.
Security for example, as all the data required to run these scripts would be hidden from the developers, kept secretly by Jenkins. This is especially useful if you work with remote developers for example (like freelancers that are not part of your permanent team), and you’re not at ease with the idea of giving them an ssh access to your server.
This approach also removes the pain that could be associated by doing all those steps manually. As a result, you might get an easier on boarding from your team, and more frequent pushes to the staging environment, because in the end the developer’s job ends when he has merged his code on the develop branch.
Delegating the knowledge to the machine is also a good knowledge capitalisation in the long run. Maybe there’s a deployment expert in your team, what will you do if this person leaves the company? Or maybe you know all the steps to deploy a project right now, but if you append to work on something else that works differently for 6 months, then go back to this project for a fix, will you still remember everything that needs to be done? What about if you delegate this fix to a new teammate? Jenkins will always remember and do all the necessary tasks in the right order. One less burden on your shoulders.
And you? What’s your CI strategy?
Source Control Management (SCM)
Continous integration puts SCM at the heart of the process. It’s by doing certain actions on the SCM that you’ll trigger CI builds.
Here again you’ve got several strategies at your disposal, we’ve chosen to use GitFlow. That’s a bit beyond the scope of this article, I’m not going to expand too much on GitFlow here, but there are nonetheless some aspects to mention.
For us, in GitFlow, the master branch illustrates the state of what is currently on the production server, and the develop branch illustrates the state of what is currently on the staging server. When we develop a new feature, we open a feature branch that is forked from develop. We work on this branch until we are ready to merge it back to develop, by opening a pull request for instance.
We’ve configured our GitHub repositories to send a web hook to Jenkins when a change happens to them, this way Jenkins gets notified of the change and launches a new CI build. You could also ask Jenkins to periodically poll your SCM, but that’s less efficient.
To add this kind of webhook, go to your github repository page, then Settings / Webhooks:
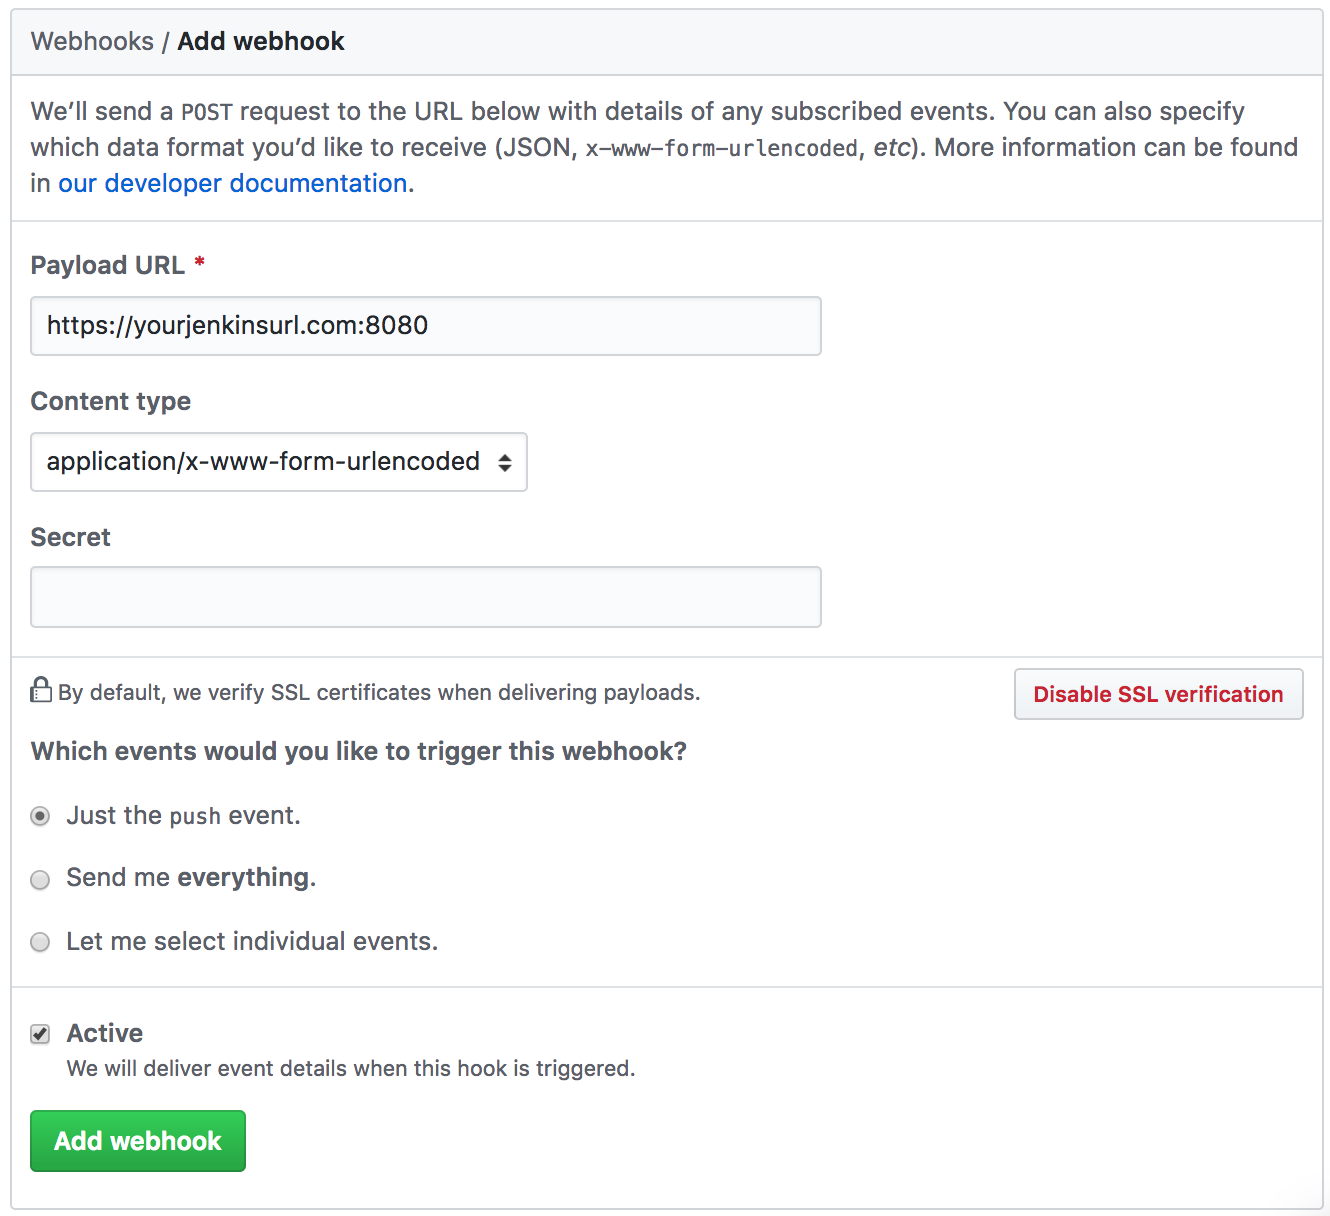
As ou can see, SCM is really at the heart of all this as CI relies on branch state and branch actions to know what to build.
Installing blue ocean
I’ll consider that you already have a running Jenkins instance to concentrate on the addition of blue ocean.
Blue ocean is actually a Jenkins plugin, so to install it you can go to > Manage Jenkins > Manage Plugins > Available, then type Blue ocean inside the filter input search.
Once you’ve located the blue ocean plugin, install it. And that is all really because Jenkins will take care of downloading all the required dependencies for you.
Once the plugin installed and the Jenkins restarted, you should have an ‘open blue ocean’ link in the left hand side sidebar.
The Jenkinsfile
You didn’t need this kind of file before to make CI pipelines with Jenkins, this is new. This file allows you to declare a pipeline directly in your project instead of declaring it by configuring it inside jenkins.
By default, Jenkins looks for a Jenkinsfile directly at the root of your project files, but you can tell him to look elsewhere.

Depending on the kind of job you’ll declare later on in Jenkins, this file could also serve as a trigger to create jobs automatically, from within GitHub organizations for example.
The pipeline
Like we’ve said earlier, our aim is to automate different tasks that we repeatedly do when pushing code online.
Here’s the essence the pipeline script that I usually use:
pipeline {
  agent any
  stages {
    stage('Build') {
      steps {
        script{
        	defineVariables();

            echo "Starting Build #${env.BUILD_ID}, triggered by $BRANCH_NAME";

            if(env.runComposer=='true'){
                try {
	                sh 'composer install --no-dev --prefer-dist';
                } catch(exc){
                    handleException('Composer install failed', exc);
                }
	        } else {
	        	echo 'skipped composer install';
	        }

	        if(env.runNpm=='true'){
	            try {
	        	    sh 'npm install';
                } catch(exc){
                    handleException('npm install failed',exc);
                }
	        } else {
	        	echo 'skipped npm install';
	        }

            if(env.runBuild=='true'){
	            try {
                    sh 'npm run sprites';
                    if(BRANCH_NAME=='master'){
                        sh 'npm run build:prod';
                    } else {
                        sh 'npm run build';
                    }
                } catch(exc){
                    handleException('Building the front failed',exc);
                }
            } else {
            	echo 'skipped npm sprites & build';
            }
        }
      }
    }
    stage('Deploy') {
        steps {
            script {
            	try{
	                echo "Deploying $BRANCH_NAME branch"
	                def creds = loadCreds("livraison_occitanie_${BRANCH_NAME}_credentials");
	                deployCode(creds);
	                finalizeDistantMigration(creds);
	            } catch(exc){
	            	  handleException("The $BRANCH_NAME branch deployment failed",exc);
              }
            }
        }
    }
    stage('Integration tests') {
        steps {
            script {
                try {
                    if(env.runCypress=='true'){
                        def host = '';
                        if(env.siteUrl){
                            host = env.siteUrl;
                            echo "Starting integration tests on $host"
                            sh "cypress run --env host=$host"
                        } else {
                            echo 'No host defined to run cypress against';
                        }
                    } else {
                        echo 'Skipped integration tests'
                    }
	            } catch(exc){
	            	handleException("Cypress tests failed, which means you have a problem on your $BRANCH_NAME live environment",exc);
                }
            }
        }
    }
    stage('notify'){
        steps {
            script {
    			    notify(env.slackMsg,env.slackColor);
            }
        }
    }
  }
}
I’ve omitted function declarations for the sake of clarity, but you can download the full script here. Let’s explain what it does in a bit more details, but remember, I’m in now way an expert, this is truly experimental. That works for my needs though, so let’s see if it can be useful for you as well.
Local build
The first big step is to have Jenkins create a local build for him. In a GitHub multi branch pipeline, to do so it first pulls the latest changes from your source control. I realized that’s an important thing to know, because it implies that Jenkins needs to have enough space to do so. And the more branches you build, the more space you need. Some other CI tools do not work like this by pulling the code first, they’re just scripting tools. But in a GitHub multi branch pipeline, Jenkins pulls the code first. That’s probably a reason why there are so many cloud based CI services online actually.
Once the code has been pulled, I ask him to log a few messages with information about the build. You can find the list of accessible variables from inside a job there: Pipeline syntax > Global variable reference.
Then I run a composer install and a npm install. I’ve had troubles with these instructions when I started, because I realized that it depends on the capacities of the agent in which you choose to run your pipeline. So it worked on my machine, but not online because my online Jenkins didn’t have natively access to those tools. This is because the agent I have chosen is ‘any’. You could choose a docker agent instead, if so make sure this docker agent has the right capabilities you then use in your pipeline script.
Tests
The thing I realised with tests is that the build that Jenkins creates while running a pipeline should be considered as autonomous and disposable. In other words you should be able to recreate the entire environment with code and database, run your tests against it, and if it works carry on with the pipeline, to eventually destroy the entire local build at the end, hence the autonomous and disposable. If your unit tests require a complete database bootstrapping for example, you should make sure that your pipeline is able to recreate the complete environment for your tests to run correctly, and I find that this is not an easy task.
Once your environment is ready to run your tests, you can run many different types of tests against it, in sequence or in parallel. For example, you could run unit tests first, then a set of parallel browser tests, and if all goes well, let the pipeline carry on.
I’ve tried a unit test setup with phpunit, and Jenkins is able to understand your test report directly out of the box and abort the build if tests do not pass. If you want to produce some code coverage stats, it won’t work unless you have on your Jenkins machine a tool that can do, such as Xdebug for example.
Delivery
In my strategy, I imagined to deploy the code the the remote environment by using rsync. I know how to use this command, that wasn’t really the issue here, it was more how to handle credentials safely. I didn’t feel like writing the complete rsync command along with the user authentication in it directly in a script that is versioned inside the project (remember the security considerations we evoked at the beginning). Furthermore, the user used by the command changes depending if I need to deploy the code to staging or production environment.
That’s when I learned about credentials. With credentials you can store sensitive information in different format against an id you can use to retrieve that information from within the pipeline. What I like to do is to create a JSON file where I put all the information I need for the build, then store this file as a secret file credential. Inside the pipeline I load up this file and have access to all the secret login, passwords, db names, path…
Also bear in mind that in this kind of setup it’s the Jenkins machine that works for you and will execute the commands you want in a non-interactive mode. That means you won’t have the opportunity to enter parameters by hand along the way. So you need to parameterize your commands, and make sure no password prompt will show up during a command. This is usually avoided by authorizing the Jenkins machine on the remote host via an ssh key.
Notification
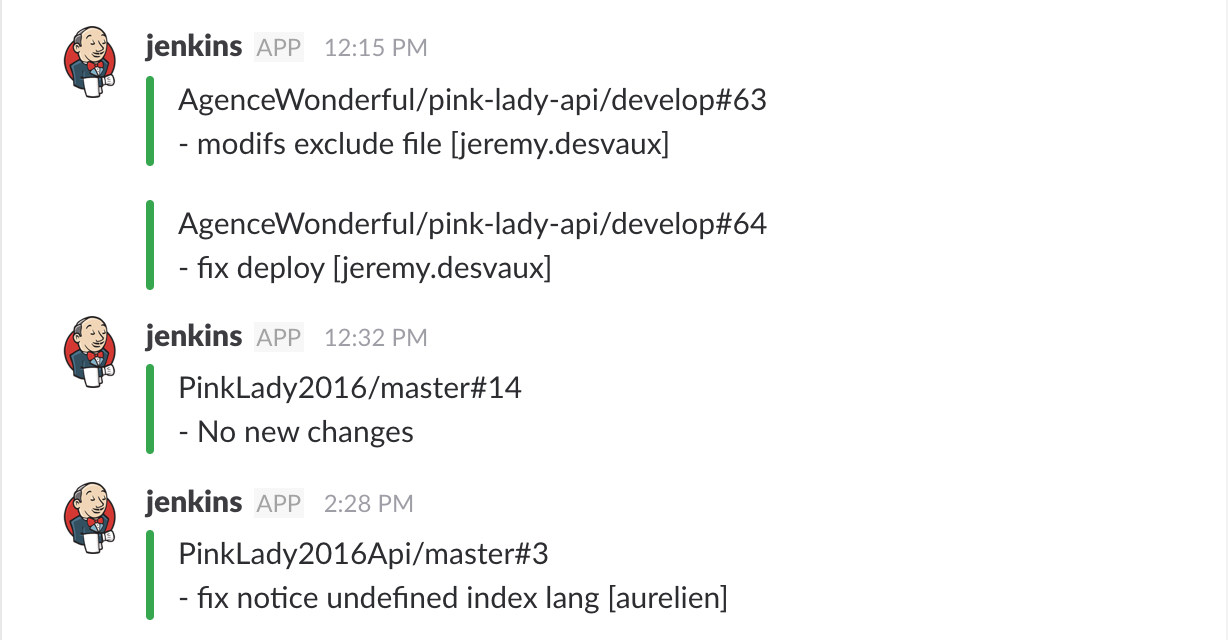
If you don’t want to open up your Jenkins every time you push code on a branch wondering if the build is running or not, it’s nice to have a notification mechanism in place. You could send notifications when a build starts, fails, succeeds, and this way everyone that is interested in the project could follow what’s going on.
Enabling a slack notification once every build is finished has had a very positive impact on my dev teams, but also beyond that, on project managers and POs for example. They found it quite useful to follow what was pushed on the staging environment along the way, it was a good informal communication from the developer to them that let them know the work is progressing. (Side note, this requires the slack notification plugin).
Closing thoughs on the pipeline script
I know this script is far from perfect, there are a number of things that bother me, for example there’s a bit of duplicate code, and I’d like the script to send a slack notification when the build fails. I’d also like to launch certain actions only if a particular file changed, like composer install only if composer.lock changed for example, I’d like to have near 0 downtime deploys with current folders symlinked and so on.
But I’m also pleased that it does perform the tasks I wanted to automate. It’s able to create its own build on its own, it’s able to deploy the code remotely by looking up credentials securely, it’s able to perform some db changes, and it notifies in slack when a build’s online, and so far that’s been a great achievement for me knowing the fact that I’m not a sysadmin and that I’m not a CI expert at all. I figured that with CI, it’s better to start small and iterate than to imagine the ultimate pipeline right away. I wasn’t really confident but I tried a few things out, figured out pitfalls, made some baby steps, and eventually got something useful working.
I’d love if a proficient jenkins pipeline user would give me some advice on the points to improve. In the meantime you can download the entire script here.
If you’re looking at a good resource to learn the pipeline syntax, I recommend this one : Declarative Pipeline With Jenkins
Declaring a new multibranch pipeline in jenkins
Having a new Jenkinsfile ready to be read by Jenkins in your project is good, but not enough, you also need to create a new Jenkins project to associate your dev project.
To do so, go to new Item, and set the project type to multi branch pipeline.
Remember that SCM is at the core of this multi branch pipeline concept, so that’s not a surprise to see an SCM source settings here next. In the branch source section, connect your SCM source. I tend to use GitHub so that’s what I choose in the dropdown. This has for effect to add a GitHub settings panel to fill up.
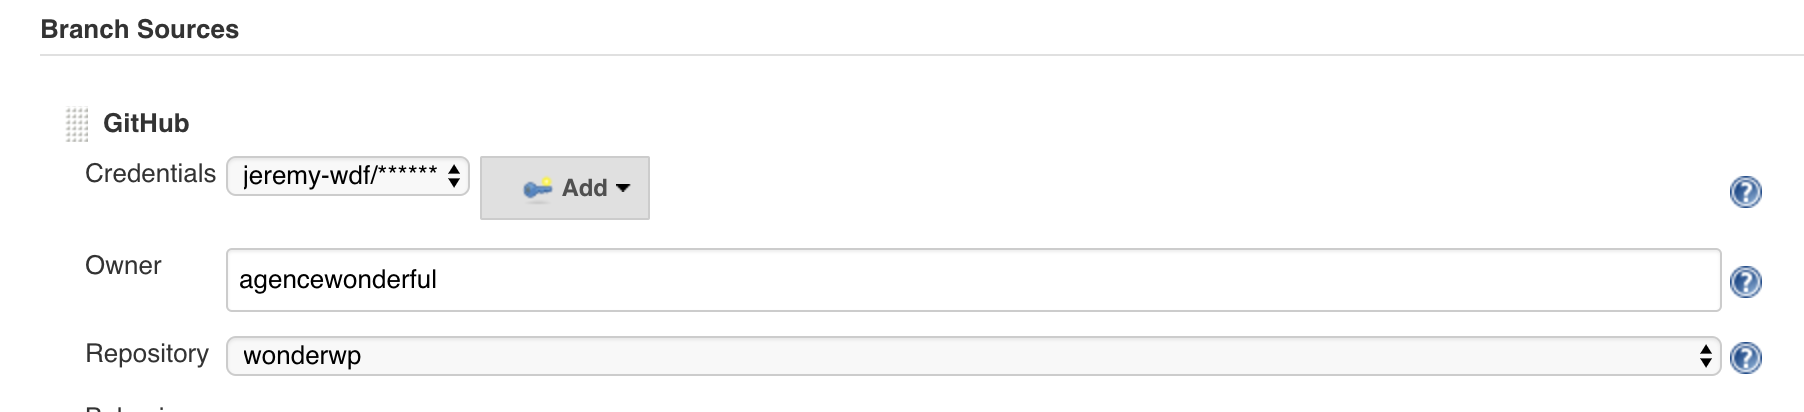
One of the thing it asks you is to attach a credential here, I’ve therefore created a credential with my GitHub account information so Jenkins can use that to connect to my account on my behalf to retrieve the list of all the repositories I have access to, be it public or private. The owner input is the GitHub owner, yourself or your organisation most probably.
Once your credential and owner filled, you should have access to all of your repositories in the Repository dropdown, so pick your project with the Jenkinsfile inside.
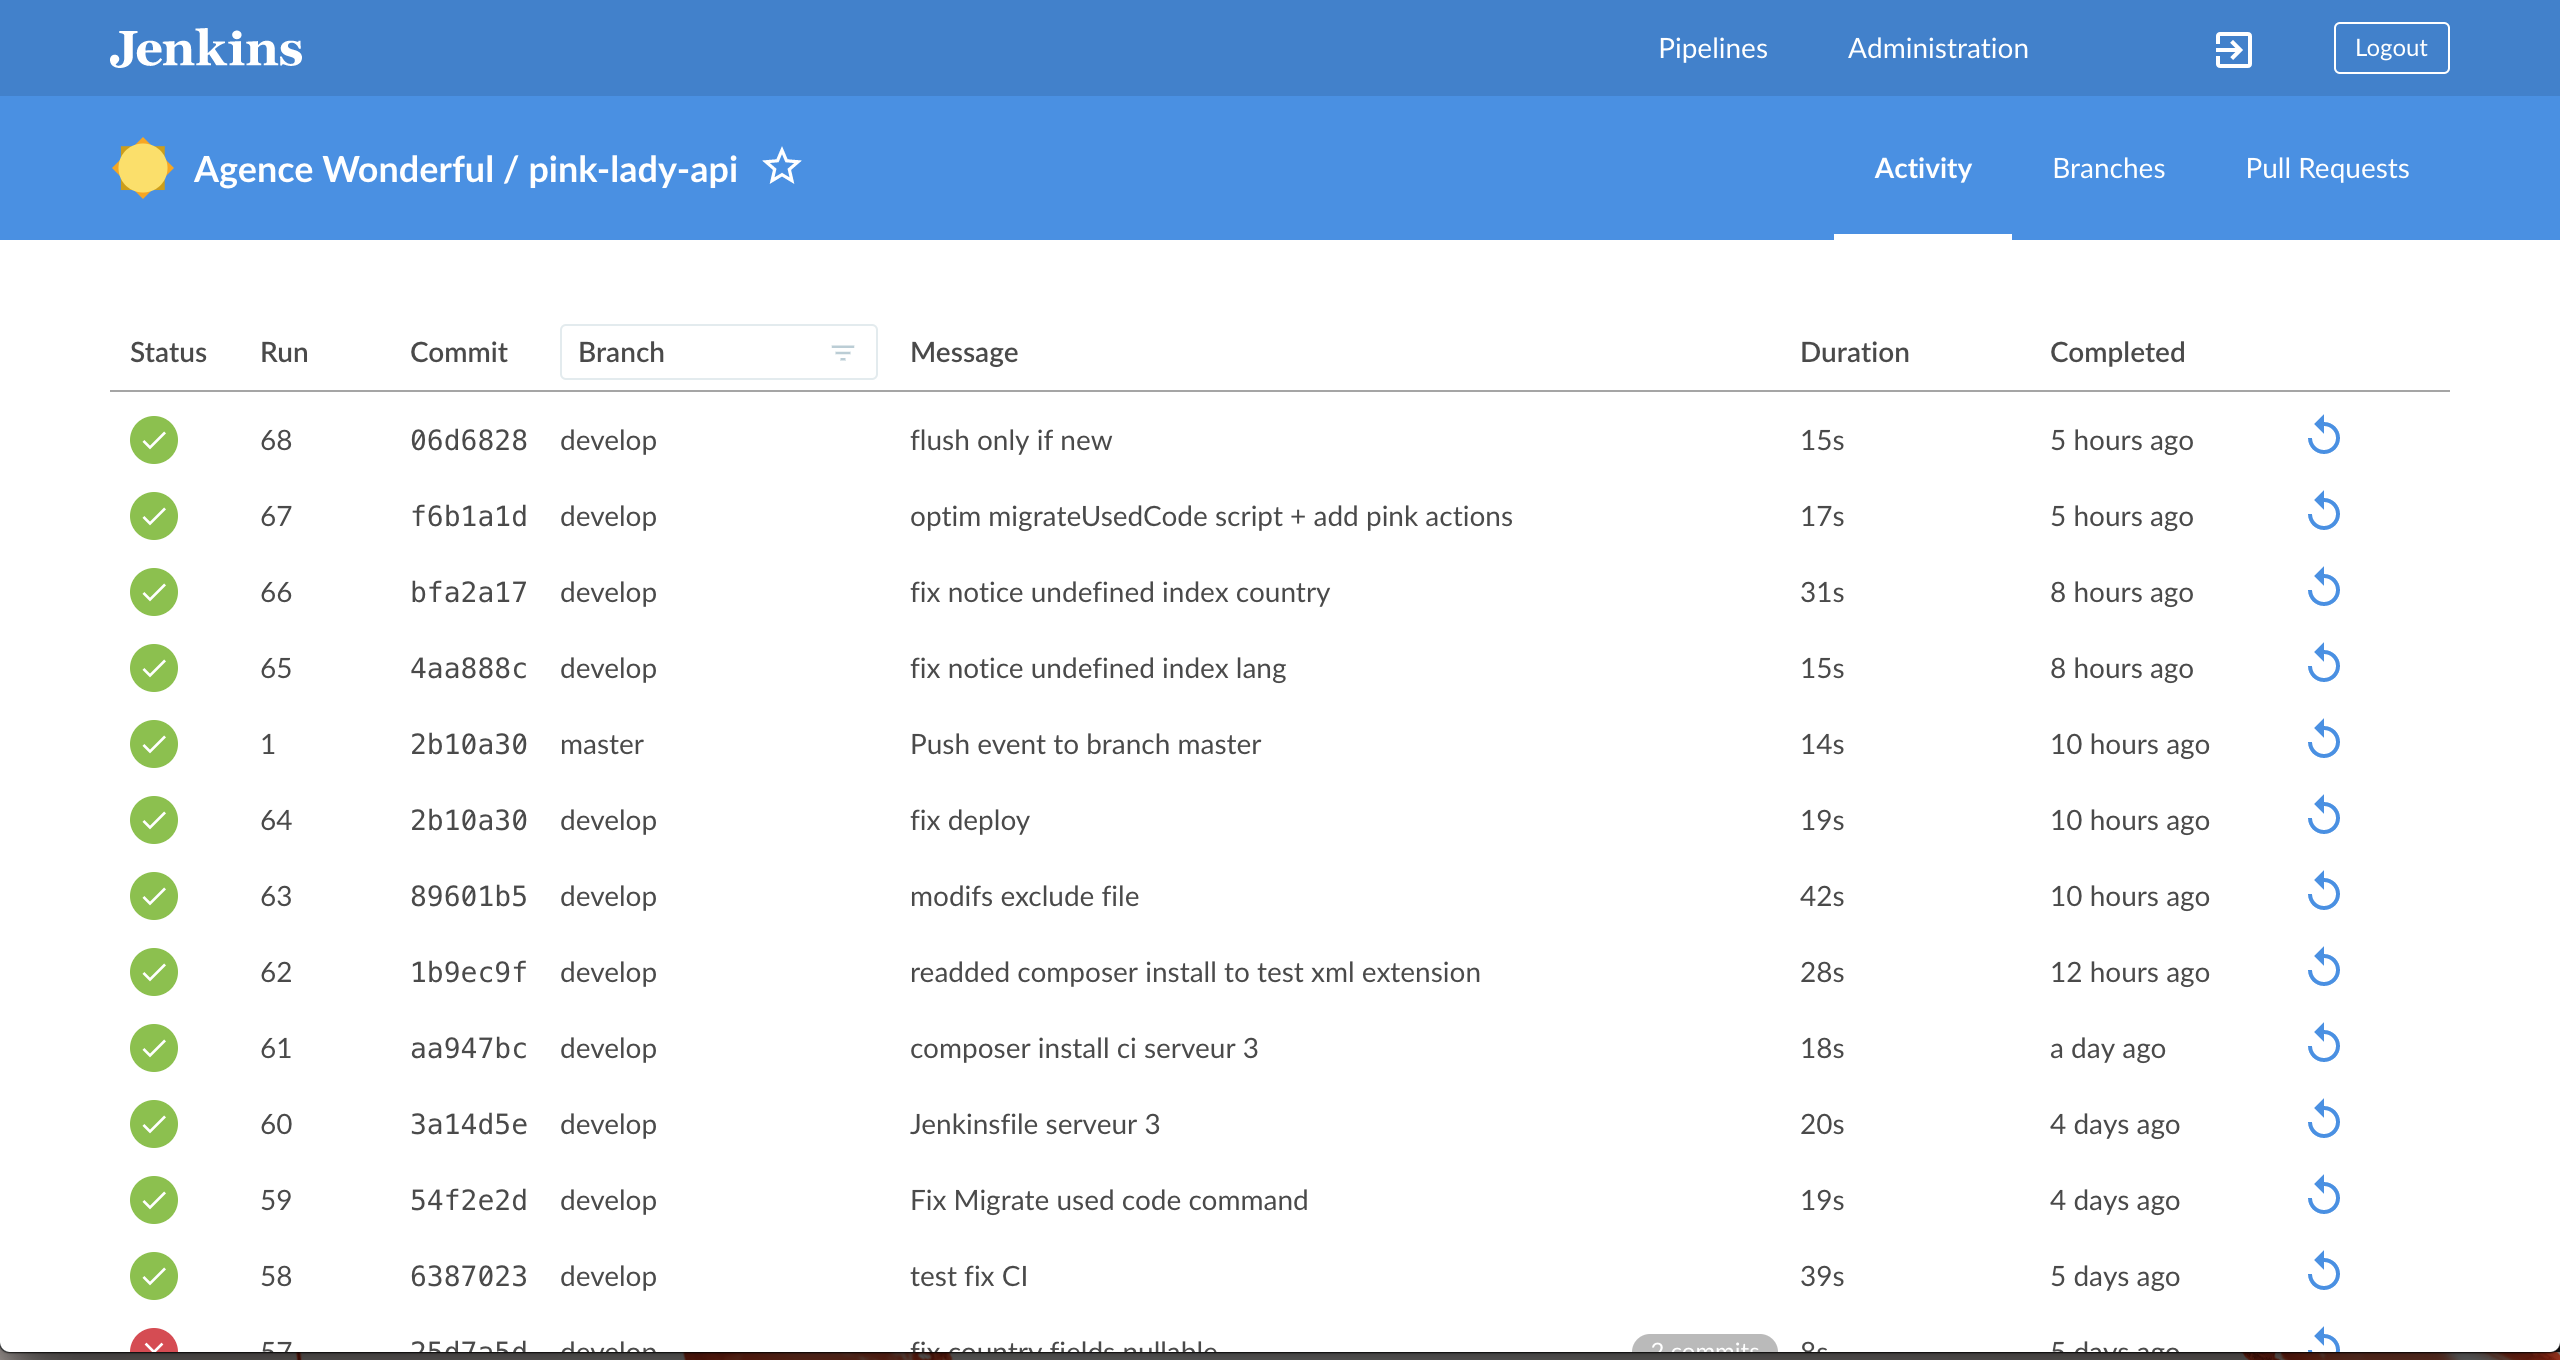
By default, Jenkins will clone every branch you push to your remote repository to its local machine, and run the Jenkinsfile on it. This could require a very good machine if you have many branches to build, and / or many projects managed by Jenkins. I wasn’t really aware of that before I started CI. Cloning locally many different projects could use up a huge amount of disk space. So I’ve instructed Jenkins to only build certain branch patterns automatically (The filter by name (with regular expression) settings) , and to only keep a limited number of builds per project, and within a limited period of time (Days to keep old items and Max # of old items to keep).


So as you can see, even with a limited number of settings, you can get your new job running quite rapidly.
Now that you have your Jenkinsfile in your project, and a Jenkins job configured properly, (and the github webhook we talked about earlier setup properly), once you start pushing code to your remote repository, Jenkins should be listening for the push event to grab your code, and run your pipeline script against it.
Conclusion
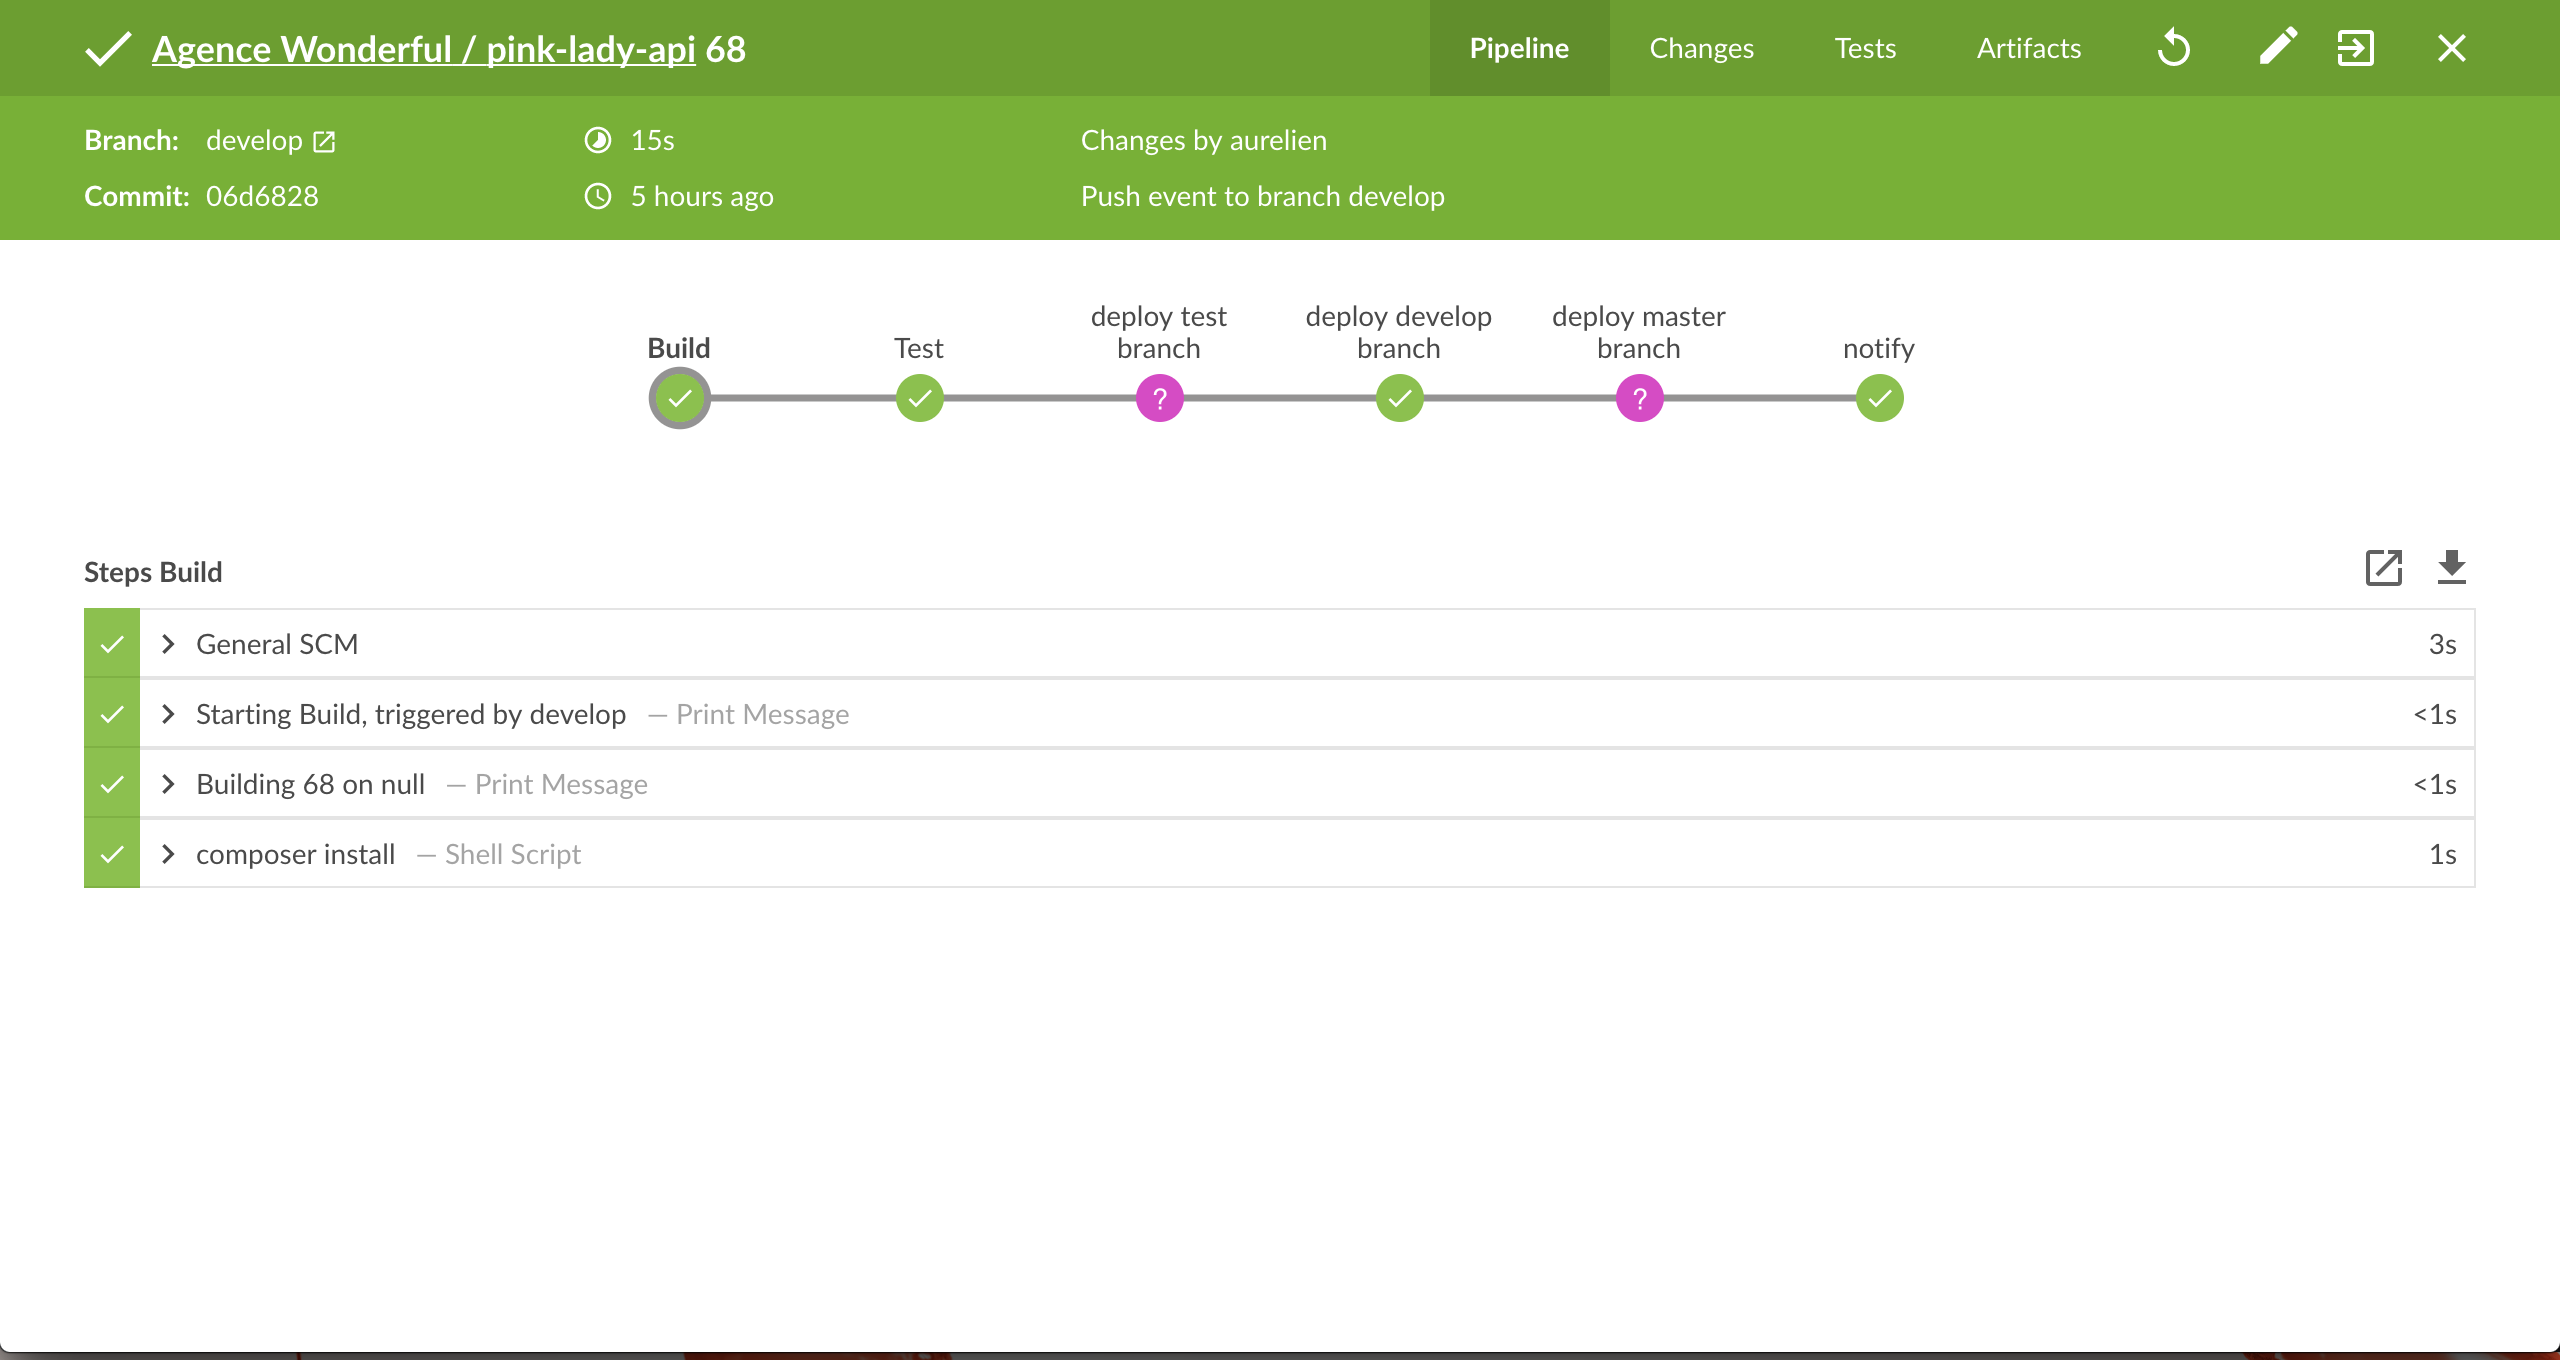
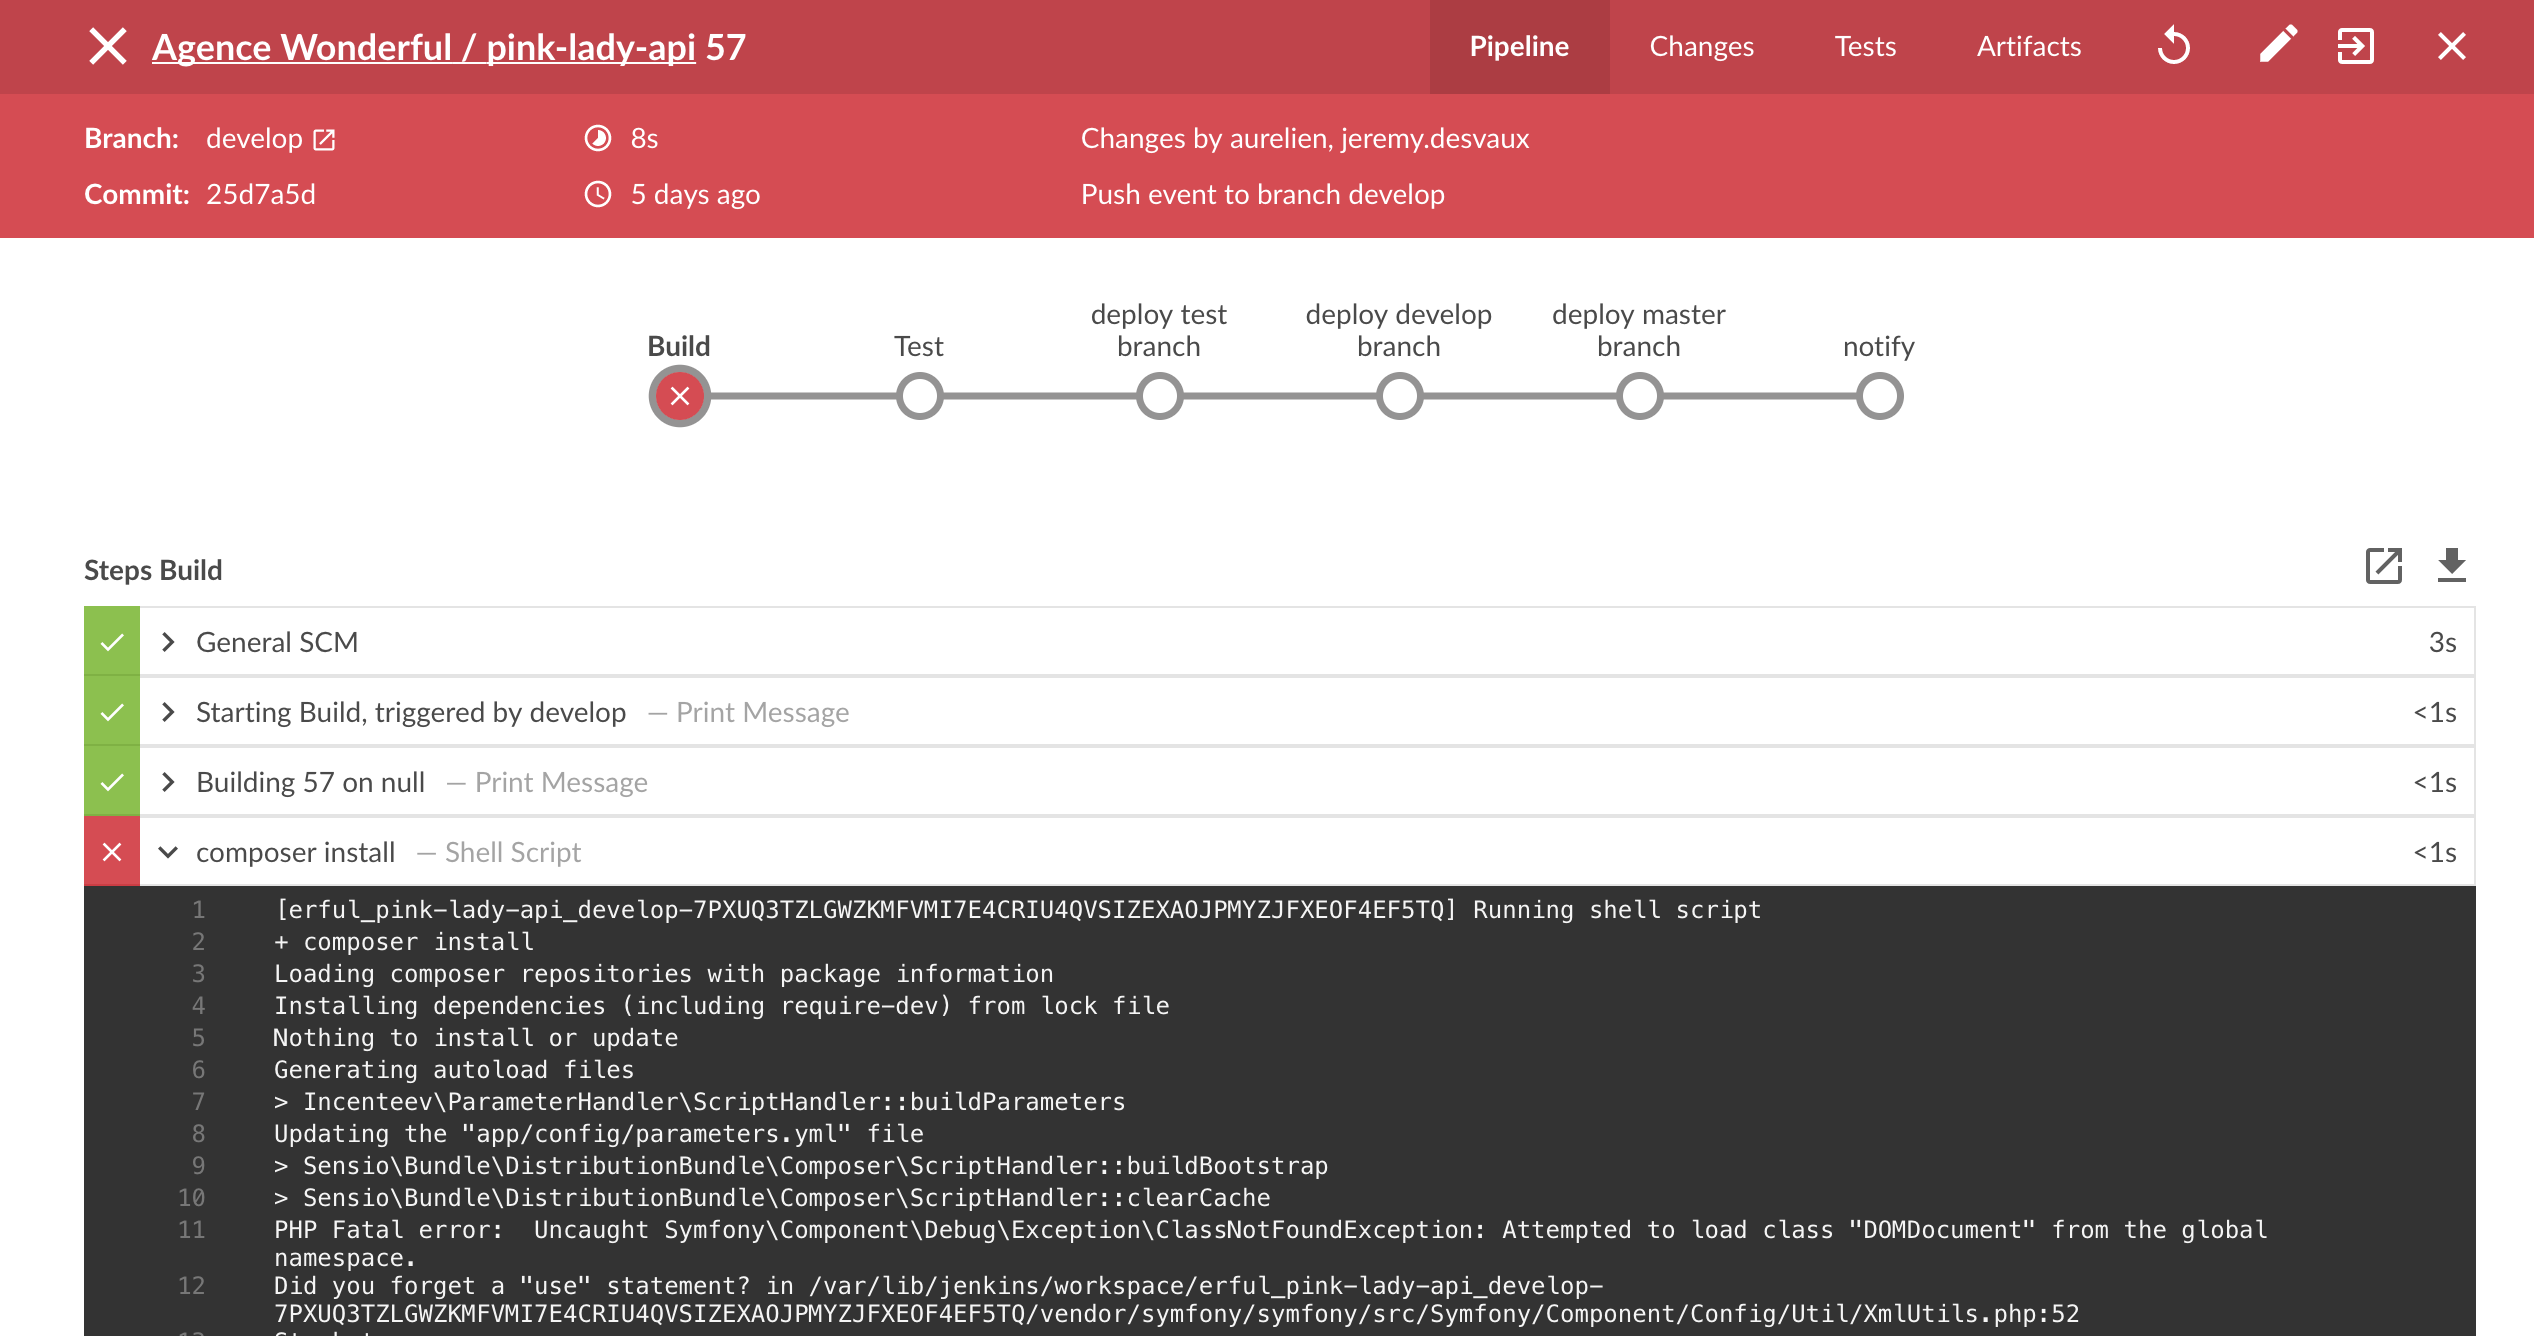
I find the new blue ocean UI very very nice compared to the ageing previous UI. It’s fresh and bright, feels flat and modern, but it’s not just a pretty face. The new UX is nice as well.
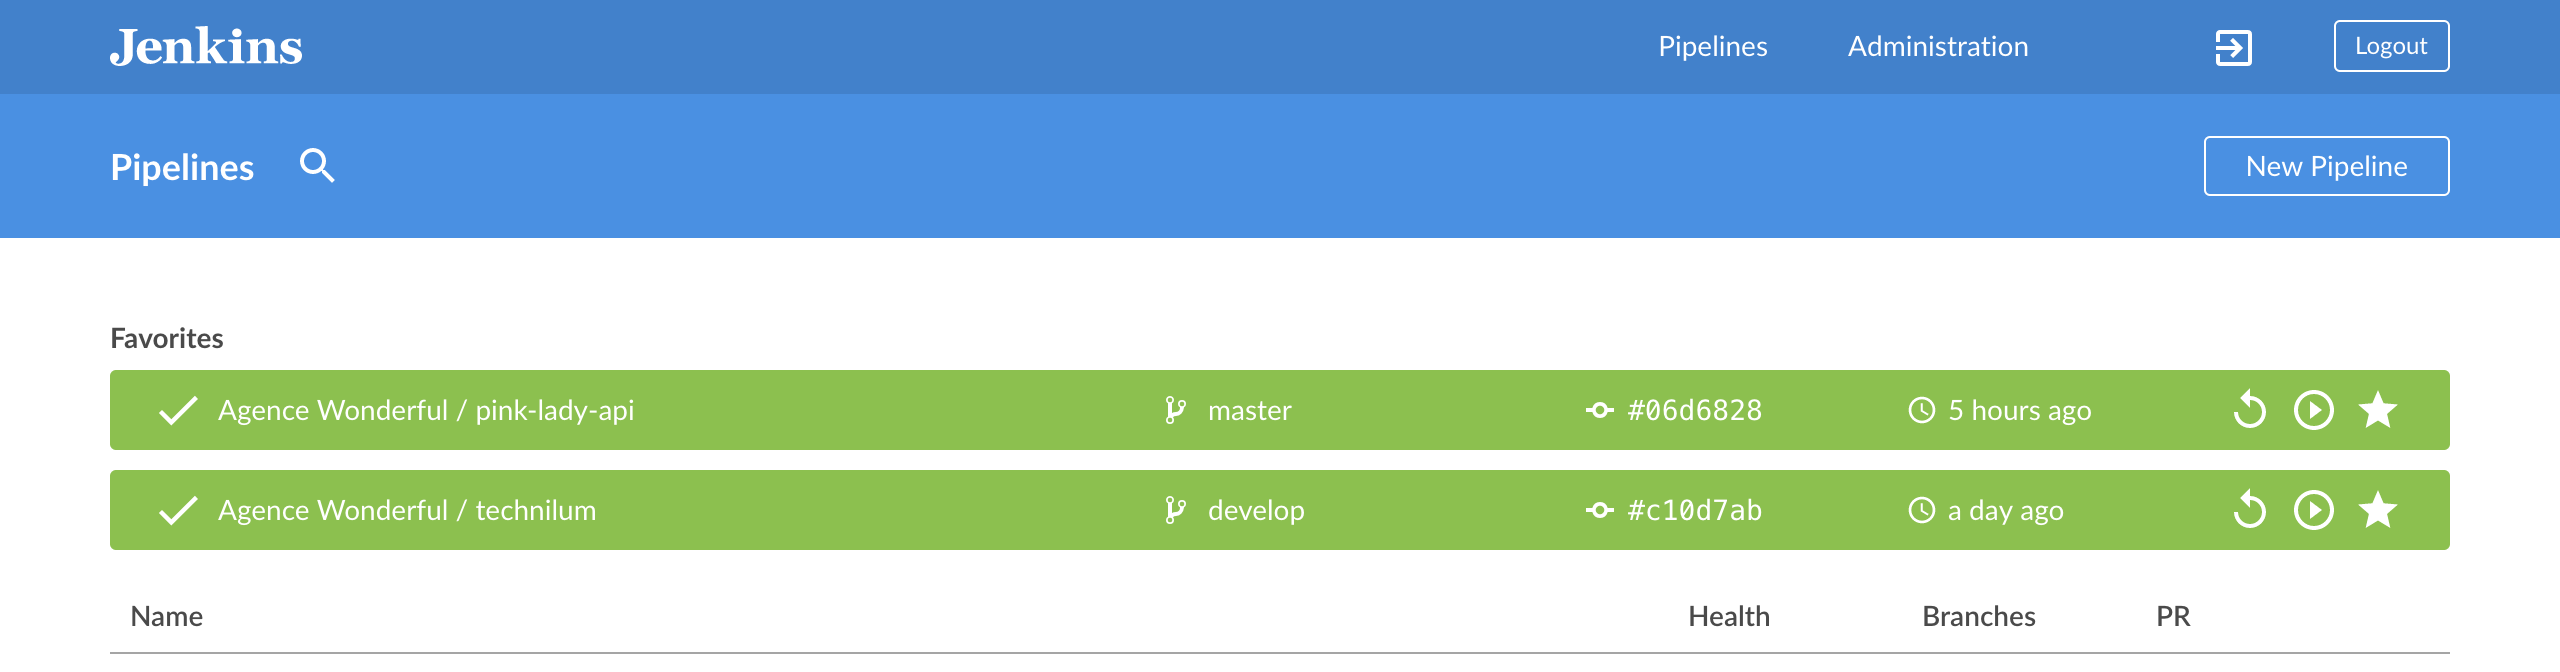
For example, you can browse the list of all your pipelines, put the ones you care the most about at the moment in favourites which is nice because it puts them at the top of your pipeline list.
When viewing the job detail page, the new UI looks so much better than the legacy view! You can see all the pipeline steps, and if anything goes wrong the view will point you to the issue right away, saving you from browsing 3 kilometres long logs.
The new pipeline syntax is more declarative, and therefore might require more work from the developer to master its syntax, and much time from him to implement what he wants. But once you have a solid pipeline running, the gain of time and energy in the long run is definitely worth it.
I’d always be thankful to my loyal Jenkins for helping me pushing my team’s code online every time we send a few commits, and I’m delighted to use this stable and nice looking tool daily.
I hope this feedback on my personal experience will be useful to any fellow developer out there. Good luck setting up your own pipelines! Let me know what you’ve built in the comments.
If you found this article interesting, I encourage you to follow my work via the form below. I mainly write about production teams' optimization, processes, management, and the tooling around those subjects. I’m even preparing an online course to concentrate all of this for you in a unique place. I hope it can help you get the very best out of your development team.
Follow my work
Follow me to get notified of new posts, resources, and online courses I create.